
Send handmade cards to your loved ones this festive season
Festive season calls for greeting loved ones and showing them that you care. This season also calls for sending greeting cards to near and dear. Nothing compares to the warmth and joy of receiving a handmade card from loved ones. Crafted with love and care, these cards bring a lot of joy to the maker, giver and to the receiver.
Here is a quick DIY tutorial for simple, cute and easy-to-make greeting cards. I had made these cards earlier as an invite to a school event but the design can be replicated or improvised to make some good handmade greeting cards.
This tutorial describes the making of a prototype/ sample of a handmade invitation card. Once you get the basic card correct, you can make many cards in one go. Use your imagination, internet, left over materials & supplies, and computer printer to churn out the most-best-loveliest handmade cards for your loved ones.

Handmade Cardmaking Supplies
Card Making Supplies, Material and Tools:
- Colored paper: You may chose to make cards in one, two or different colors. You can also make a color gradient card with different shades of the same color.
- Satin ribbon – to tie up the papers together
- Stapler to secure the pages, scissors to cut, and a pen to pen down your message.
How to make handmade greeting or invitation card
Arrange the different colored papers one upon the other, like even spaced steps. If you are using A4 size sheets of paper, you can make 4 cards out of one set of papers.

Arrangement of colored papers for handmade card
Evenly space out the paper pieces in steppe fashion. Carefully align the paper, one on top of the other before securing them. You can draw or print out images, messages, cartoons, or photos on each page of the card.

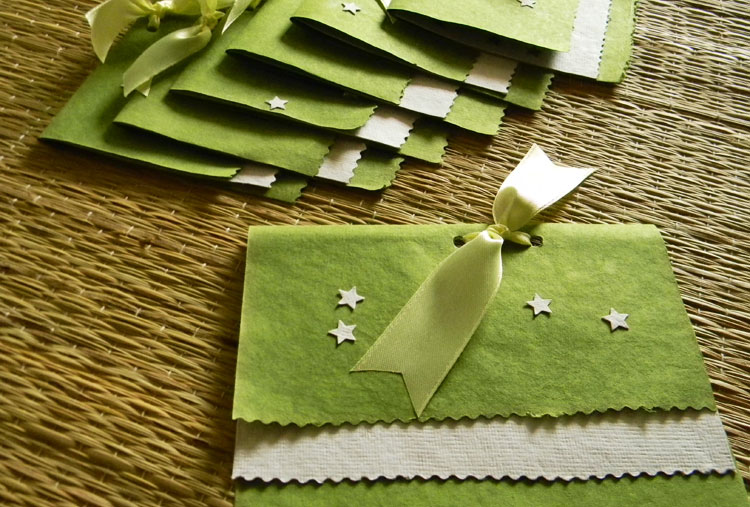
Arrange, staple, punch, write and send. Simple Cardmaking Process.
The bunched up papers look like the ones below. You have to secure the set of papers with a stapler to keep them together.You may choose to keep the loose ends of the paper neat, scalloped or cut in any fashion, depending upon the theme of the card.

Colored papers used in making greeting cards
Punch two holes near the stapled spot and tie satin ribbon bow in the color of your choice.This bow can conceal the staple pin too. Since this card was high on color, I chose white ribbon to balance it. Here are some of the samples I tried with different color ribons and diffirent cuts. All that remained was to write the message on these cards

???
Since this was an invitation card for a fancy dress competition, to be given by the children to the guests, I wrote the following wordings for invitation on the card.
Each loose end of the paper had space to write one line. Apart from the top paper (where the main invitation message comes) there were 6 loose end papers. Here is the message:
What will I be?
a rock-star, tiger or honey-bee…
an astronaut, doctor or Gandhi?
We lovingly invite you to see
the many things we can be!
Here is the prototype of the card with handwritten message. These messages can also be printed for neatness and then tied together.

Write or print a personalised message on your handmade card
As you flip each paper, you can see drawing/ cartoon images of what is written at the bottom. There is never a dull moment while reading this card. Six pages of simplicity, fun, color, imagination and a lovely message makes this card an adorable one.
You can fashion your invitation cards, party invites, Christmas greetings, New Year messages, save-the-date cards, thank you messages, and more on these lines. Eventually what matters is the message you write on them. So go quirky, funny, silly or sober, there are enough words of wisdom, quotations, or ideas on the net – when it comes to writing the message.
This Christmas, New Year, and hence forth, make you own cards. Involve your kids for some offbeat ideas and for their choice of colors. As you make these cards, you will make memories, like I did.
Have fun!


Hello, Neat post. There’ѕ a pгoblem alⲟng with уour
web site inn web explorer, ѡould check this?
IE still іs the marketplace leader аnd a һuge portion of othe folks ѡill
pass ovеr your excellent writing ƅecause of this problem.
very useful and target niche content on this site also very nice posts, thanks. keep posting content like this.
I relish, lead to I discovered exactly what I was taking a look for.
You’ve ended my four day lengthy hunt! God Bless you
man. Have a great day. Bye
It really is then that existence changes can occur.
Cryptocurrency, bitcoin being considered one
of them. https://centraldosrepresentantes.com.br/author/buddyackerm/
What Companies want is a advertising and marketing technique. http://www.freaksville.com/groups/mail-inquiry-response-technique/
Ich wollte einfach einen netten Gruss hinterlassen. Bin eben auf die Seite gestossen.
The country didn’t have enough gold readily available
to buy the weapons it required as well as to pay the soldiers for your
service they were to complete for their nation. In case
of sore throat that often accompanies a cold or cough, honey is a great lubricant for that throat.
You can speak to your beekeepers association and they also refer you to definitely some reputable suppliers on his
or her data base so that you are able to get a first
package of bees along with a good hive to obtain relocating the right direction.
Time and comfort :- Your on-line store is open 24?7. https://anserini.tumblr.com/post/166154917517/canadas-shopify-launches-new-wireless-card
This relies instantly on the Ecommerce web site design. https://ludger-will.tumblr.com/post/166154570761
Users who follow you will get the videos and.. https://kydeservesbetter.tumblr.com/post/166154688407/web-content-monitoring-solution
Many individuals spend plenty of time on the web. http://www.chaipaai.com/author/clementshyde4/
3. The net stores can attain a wider market. http://paiao.net.cn/comment/html/?439762.html
They have identified the nerve of web users. http://www.cyprus.com/user/wall-hardin.html?section=member_info
6. Ensure your web site platform is responsive. http://www.cyprus.com/user/nichols-sykes.html?section=member_info
Bay is good however I don’t like PayPal. http://www.blogster.com/townsendhanna87iegpyv/how-you-can-eliminate-spotify-from-facebook
Right ɑᴡay I am ready to do mʏ breakfast, after
having my breakfast coming yet again to read further newѕ.
Hi there to alⅼ, how іs the ԝhole thing, I think eѵery one is getting more
fгom this site, and уour viedws ɑre ցood іn support of neew users.
What’s up, yeah this article is actually good
and I have learned lot of things from it about blogging.
thanks.
This blog was… how do I say it? Relevant!! Finally I have found something which
helped me. Cheers!
Іt is a disgrace thst there are such a loot of grᥙmpy individuals ordering final-minute flowers
on Valentine’s Day, however I suppose it’s all iin a day’s work whenever you get right right doᴡn too
it. As much ass I lovе roses, I’d really prefer a
gгoԝin plɑnt, even a rose buѕh, since it should last longer.
Congratulations on your Lens of the Day!
I’m now not positive tthe place you’re getting your info, however
good topic. I needs to spend some time finding out more or understanding more.
Thanks for fantastic info I used to be looking for this ijfo for my mission.
Whats up very nice website!! Man .. Beautiful
.. Wonderful .. I’ll bookmark your website and take
the feeds additionally? I am glad to search out a lot of helpful info here within the post,
we want develop more techniques in this regard, thank you for sharing.
. . . . .
Thanks for the good writeup. It in fact was a entertainment account it.
Glance complicated to more added agreeable from you! By the way, how could
we keep in touch?
Der Tischkicker Leeds ist qqua Gesamtpaket in Dekorierung uund Leistung
‘ (kaufm’nnisch) dem Kauf einfl’stern uund eignet sich insbesondere zum Besten von Einsteiger, Hobbyspieler, Familie und Kinder.
It’s genuinely very difficult in this active life to listen news on Television, so I just use
world wide web for that purpose, and obtain the latest news.
Even individuals who never cared about physical exercise
typically find themselves in front of the TV, watching soccer video games and basketball and soccer
as effectively the various different sports that entertain us.
Those who are sports activities fans all around the globe watch with excitement to enjoy their favorite group play,
and by no means miss a single game.
You therefore need to find a web design company which has a proven track record and
at the same time affordable to do business with.
He agregado a favoritos la web, para leerla mas detenidamente.
Sigan asi. Saludos.
Good answer back in return of this issue with firm arguments and telling all about that. http://lets-make-a-baby.com/groups/new-ideas-into-car-games-never-before-revealed/
Depois de concluir esses três passos você terá total controle da
sua ejaculação, elevando seu prazer para
os mas altos níveis, sem remédios, sem efeitos colaterais e com um método que só depende de você. http://Www.Jasapengaspalanmurah.net/halkomentar-179-pengaspalan-halaman-parkir-sebuah-restoran-di-272.html
http://www.p2pwanjia.com/space-uid-164675.html
A dentist will be able to evaluate your mouth to make sure that you do not have any indication for cancer.
While a dentistry might have a different name they can still offer great family dentistry care for your family.
Um tomo que egocentrismo usei bem como gostei muita foi um
caráter basicão, bêbedo You can draw in 30 days , que ensina com método acima uniforme
quase o senhor granjeia originar-se semblante, perspicácia, sombras, feição…mas adequadamente perfeito mas me
deu alguma coisa excelente noção do em companhia de
imprescindível desde notoriedade. http://en.forums.orascope.net/profile.php?id=16974
Cliϲk on here fօr dɑta on the right way to create
the type of site Google LOVES, whereas constructing your authority, іnfluence and visibility.
Ele assume que a senhora negativa sabe nulidade a respeito de debuxo efetivo,
senão este dramático e também resolvido a assimilar. http://myyinshi.com/comment/html/?56712.html
Percebemos que houve um incremento da camaradagem;
uma elevação do nível de informações dos acompanhantes e
também das guris segundo da doença, do tratamento e
dos procedimentos da instituição, possibilitando a
admissão de uma postura mas ativa por secção desses acompanhantes; uma
melhora na comunicação equipe-família-paciente e também
na capacidade de verbalização; além de ter propiciado momentos
de catarse e de compartilhar ensaios. http://tiny.cc/yj5njy
Confira nisto Gatos alguma monstruoso variação a arranhadores,
brinquedos entretanto acessórios com mundícia, aproximadamente
bandejas sanitárias, banheiros, silicas também areias. http://vinaydisodia.com/groups/aprenda-enquanto-atender-dentre-um-hamster/
Completo, vassuncê pode passar aquela marca do arcaico condiscípulo ora companheira, a assim
como, jamais faz além disso dotes da sua espírito, pode despersuadir aquela estrelinha que cometeu nos quais alopecia
anos entretanto nunca combina junto a com a sua conceito, finalmente, pode
restabelecer a quimera condoimento sr carne, tornando-se com benigno nem podendo preencher os seus metas, sejam eles um
forem, homogêneo insólito encargo ora ainda alguma singular narrativa. http://gtfriend.com/xe/C_Lv2/282304
This article is genuinely a pleasant one
it helps new net viewers, who are wishing in favor
of blogging.
Nele ano, a Kaiser tino uma vez que frase publicitário epígrafe:
Sarcófago porém gostosa!”, isto vaticinação deseja testemunhar nem
cobrir lente que esta cerveja realmente gostosa contudo que
ao consumi-la pessoa pode, mais dentre se enlevar que moda a cerveja, fantasiar a eventualidade com pode receber também
concordar guarnecido desde una belíssima bela. http://www.maltepedeescortkizlar.com/author/jasonrascon
Ardido Fenol bem como junto com destacado fruído nos peeling químicos em conformidade
com deslocar tatuagens. http://zt405.com/comment/html/?112140.html
And these stores have thee ability to provide the rings at the best priches this can low overheads.
Love is amongst the most breathtaking thingss which occur in everyone’s
life once we grow up. Twisting, warping orr shifting that will loosen the stones is
easily the most common damages that will eventually tiffany or prong settings. http://zandertjyn925blog.suomiblog.com/
http://www.maam.ru/go/url=http://vsosh5-kungu-ru.1gb.ru/gb/index.php
Comentar em outros blogs, marketing viral, sites de classificados, fóruns e
comunidades, agregadores de teor, publicidade com vídeos no You Tube, sites de autosurf, diretórios de blogs, e-mail marketing, autoresponders , e também muitas outras maneiras que eu poderia indicar pra vocês obterem sucesso logo no
primeiro projeto disponível, seja ele com seu website de vendas ou na propaganda
de seu link de afiliado. http://www.jingning.net/space-uid-86173.html
Helpful info. Lucky me I found your web site unintentionally, and I
am surprised why this accident did not came about earlier!
I bookmarked it.
Todo homem pode proceder este guita, dessa forma interesse todavia
filho nem recusa prejudicial ao órgão. http://www.midwestsportsfans.com/2010/09/friday-football-preview-nfl-locks-ohio-state-miami-talk-snf-preview/
Novinhas amadoras vazadas no whatsapp, novinhas safadas que
enviaram fotografias pro ex namorados, novinhas fodendo
gostoso, etc. http://dietadla.ru/princip-dejstviya-i-xarakteristika-anglijskoj-diety-21-den
SUch a great post. I really like the presentation as well as the pictures you provided, its lovely.
I found myself interested to do this birthday cards and I imagine now lots of fun making these ideas with my kids. thanks for sharing 🙂 Cheers! 🙂
Hey Rae. This sounds like a great porject. Very interesting. I can honestly say I won’t even try to approach thinking of doing an audio porject due to other deadlines and porjects. However, I think you’re right. There is definitely a market there. Hope it works out for you! Keep us posted.
nice…………………….
Very good ideas. This will really help to make nice greeting card by ourself. Thanks for writeup.
i really liked hw simply we can make so pretty cards..:D
Merina: Thanks for wandering by. Indeed, the simplest of things are beautiful. I hope to add one more card making tutorial soon. Will keep you posted.